
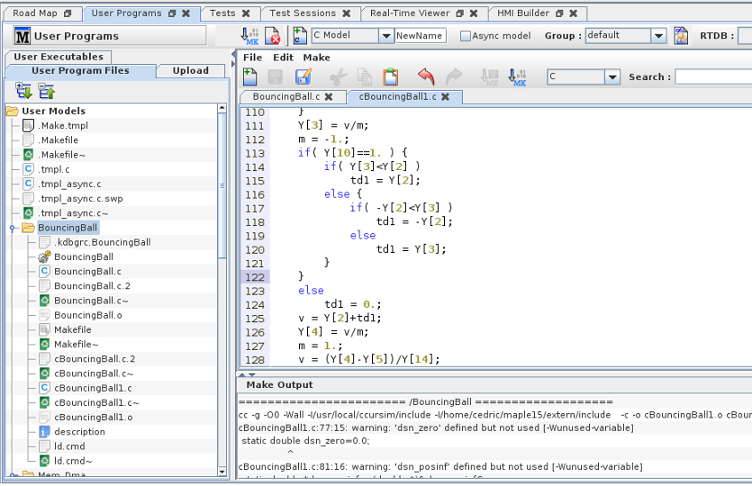
Provides a minimum IDE for creating / editing and building synchronous and asynchronous user models on the real-time host. The user-written synchronous models will run during the third sub cycle of the simulation test cycle. See Application Programming Interface (API)..
There are no Apply and Cancel buttons. Actions taken in this form take place on the real-time host immediately. It is essentially a remote-control for the compiler on the real-time host.
Expands the hierarchy tree showing User Program Files on the real time host.

Collapses the hierarchy tree showing user program files on the real time host to only show the immediate children of the User Program Files node.

Opens a short video clip that demonstrates the basic workflow of this form.

Opens this section of the manual.
Shows the user program source files present on the real-time host. Double clicking on a file will open it in the editor.
Selects the RTDB to be associated with this model. This setting is applied when the model is built.
Click on this check box to create an asynchronous model. A different template is used when creating an asynchronous model yet the model
can be edited and built through this interface as well.
Asynchronous models can be added to a test in the Asynchronous Models Tab in the test creation panel.
Selects the environment variable file to evaluate before building this model. This setting is applied when the model is built. See Environment Variables....

Creates a folder on the real-time host under the User Models folder in the User Program Files tree. Select the type of folder to create from the drop down menu, enter a name for the folder in the text box, select the group for the new user program to belong to, then press the Create button. The types of folders are:
Folder is initialized with a template for writing a model in the C language.
Folder is initialized with a template for writing a model in the C++ language.
Folder is initialized with a template for writing a model in the C++ language using CUDA.
The model folder is created with the name specified and python file is created from the template for writing a model in the Python language.
Empty folder. To place a new C file in an empty folder, open an existing file in the editor or create a new file in the editor and click the Save button.
Selects the resource group of the new user program or top-level directory.
The C/C++ model folders are create under a pseudo branch C-C++ in the tree hierarchy while the python model folder are created under Python
Changes the group the selected user program belongs to. See Group Table. This combo box is the one located directly above the Edit and Make buttons, not to be confused with the Group combo box above the Create button.

Opens the file selected in the User Program Files tree in the Editor tab. The editor will download the file from the real-time host to allow the user to edit it, then upload it back to the host when it is saved.

Runs the make command on the real-time host in the folder selected in the User Program Files tree. Selecting a file in a folder suffices to select the folder for this command. Output from the remote make command will be displayed in the Make Output tab.

Deletes the file or folder selected in the User Program Files tree.
See Upload Tab.
See Edit Tab.
See Make Output Tab.
Displays a list of all the user programs built on the real-time host.
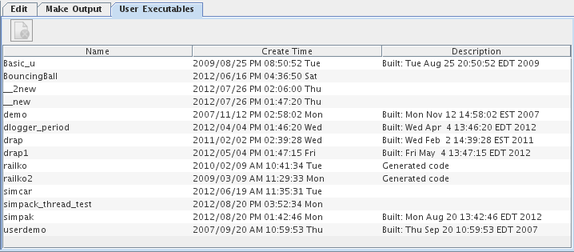
Deletes the selected user program executable from the real-time host. User program executables are stored separately from the source files on the real-time host, unlike script executables which are stored in the directory with their source.
In this use case, SimWB does not start the program, but instead it is run
via an intermediate "debugprocess" which will start the program running
with the debugger selected in $SIMWB_ROOT/bin/debugprocess. See the
comments at the beginning of that file for configuration details (e.g.
which debugger should be run, how to add a new debugger, etc.).
This mode is initiated via the Test Sessions tab. From there, select
the Debug Options tab and select which tasks to debug. When starting
the test, be sure to run it via the Run tab and NOT the run button
located at the very top right of the GUI (the debug options will be
ignored if you do).
When you start the test, the selected debugger window is opened and the
program is "paused". This gives you the opportunity to set break points,
examine data, etc., before resuming execution. SimWB will wait forever
in this mode, so don't forget to resume running.
If you are having problems getting the debug window to appear:
By default, DisallowTCP is set to True in /etc/gdm/gdm.schemas (or /usr/share/gdm/gdm.schemas) which prevents the program from starting when the debug option is checked in SimWB. Find the "security/DisallowTCP" key, and modify its default value to "false" (without the quotes). You will have to logout of X and log back in for the setting to take effect.
By default, 'DisallowTCP=true' is set in /etc/gdm/custom.conf which prevents the program from starting when the debug option is checked in SimWB. The option should be set to 'DisallowTCP=false'. You will have to logout of X and log back in for the setting to take effect.
You will need to run the command 'xhost +' in a terminal window running
under the X server that is to receive the display to disable access control.
If you are using the NightStar nview debugger you may need to modify
the NSLM_SERVER line in $SIMWB_ROOT/bin/debugprocess to point nview
to the appropriate license server.
Be aware that when running in this mode, SimWB is not running in a
complete real-time state - the program is running on CPU 0, and overrun
detection is disabled. This may or may not work for you. It depends
entirely on the test configuration, number of tasks, where they are
running, and how sensitive they may be to overruns.
A more likely scenario arises when the program generates inappropriate
data (i.e. NaNs, or Not a Number). This can happen when variables
overflow, there is a divide by zero, a zero divided by zero, etc. The
default action taken by the C run-time library is to produce a NaN as
the result and keep processing. This often leads to the propagation of
NaNs through the program and eventual failure (a process crash, a hang,
etc.).
SimWB gives you the ability to enable an FPE handler which will cleanly
shut down the test, and optionally start a debugger from the point at
which the exception occurred (thus giving you the ability to determine
the exact cause of the exception).
This is done at program build time by adding or modifying the Makefile
with the appropriate compiler options. There are four options:
This enables trapping of FPEs, a message detailing which task and exception occurred, and then test shutdown.
When defined, everything happens as above, but the task generating the FPE will be paused while the command defined by FPEDEBUGGER is built and executed. The command must contain a "%d" which will be interpreted as the process ID (PID) of the task. So in our example the NightView debugger is started and attached to the PID, with its window appearing on display pc1:1. See the discussion on getting the debugger window to appear in the previous section.
Most models depend on the C run-time default behavior of replacing a floating underflow with a zero result. If you need to trap this behavior then add this compiler option.
By default this option is specified when building a model. It is required if you intend to run a debugger and expect to see anything useful. Don't forget to retain this option.
When editing the Makefile, you would add this line just
below the include ../.Makefile:
CFLAGS += -g -DFPETRAP -DFPEDEBUGGER="DISPLAY=pc1:1 nview --attach=%d"
The debugger should be positioned at the point of the exception when started. If not, you might need to go up the call stack until you get to the offending code. When you are done, simply kill the task being debugged and the test should stop (if it hasn't already).
Python programs must include the simwbRT python module to interface with the SimWB API. This module provides native python calls to set/get RTDB item values
as well as calls to interact with the SimWB scheduler.
It is important to understand that python provides a built in garbage collector to reclaim the memory used by discarded python objects. The garbage collector runs
asynchronously as part of your python program and may lock your program execution out for an undetermined amount of time. This will impact the run time execution
of your program and introduce non real-time determinism. Your mileage may vary. You should experiment with your python models/programs to check whether this impacts
your real-time loop execution.
This should not be a factor if your write asynchronous models in python as those models are not executed in the real-time loop and the non determinism introduced3ed
by the garbage collector should be acceptable as those models are self scheduling.
Sometimes , the default python installation in your system will not allow you to install all the modules needed by your python program.
It is possible to run the python programs under SimWB from a conda container. The conda container will allow you to install all the packages/libraries needed by your program.
Installing conda and all associated python modules is beyond the scope of this document and you should research it on your own. A good place to start would be
Linux Conda Installation.
After installation, your conda/minconda will typically reside under:
/home/user_name/anaconda3 where user_name would be the login of the user who installed conda.
You will typically create a segregated environment specific to the python version and packages needed for the execution of your python programs. This environment needs to be "activated"
to run programs under it and the shell environment must be setup.
To make all this work under SimWB, you would create a python model in the SimWB gui. For example, let's create a model called pymodel. The python source will be
in a file called pymodel in a sub-folder also called pymodel under /usr/local/ccursim/projects/Your selected project name/PythonModel . Note
that the file does not have a .py extension because the scheduler will load/execute the pymodel file at startup.
Now, in order to run your pymodel under your conda environment, you have to set the conda environment for the model with the following steps:
#!/bin/bash
. /home/user_name/anaconda3/etc/profile.d/conda.sh && conda activate envname && \
    python /usr/local/ccursim/projects/Your selected project/PythonModel/pymodel/pymodel.py $@
Where envname is the name of the conda environment you created. Note the $@ to pass the command line argument from the scheduler to the python program.
See the laneprocess test in the UserModelDemos project for an example of how this works.
The current release of SimWB provides the binary module simwbRT for python version 2.6, 2.7, 3.4, 3.5, 3.6, 3.7, 3.8, 3.9, 3.10, 3.11.
In your python program , you should always import the SimWB module simwbPath before accessing any of the API calls through the simWBRT module.
When running with your default python installation, your python program file should start as:
        #!usr/bin/env python3
        import simwbPath
        import simwbRT
Replace #!usr/bin/env python3 with #!usr/bin/env python2 if your installation only has python2

|
Writing Scripts | Simulink Models... |

|