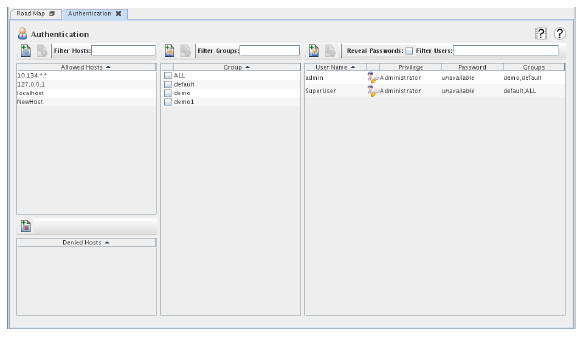
Configures authorized users of the real-time host. There are three sections to this form. The left section configures IP-based authentication used by the data logging host. The middle section defines groups to which resources may be assigned and to which specific users can be given access. The right section defines individual users authorized to use SimWB.
Reveal Passwords
Reveals passwords in plain text when they are known instead of as a series of asterisks. Only passwords that were entered or changed during this session of the Control Center are available. Older passwords are not available from the real-time host.
Displays in the allowed and denied hosts tables only hosts whose name matches the regular expression. See Regular Expressions.
Displays in the groups table only groups whose name matches the regular expression. See Regular Expressions.
Displays in the users table only users whose name matches the regular expression. See Regular Expressions.
Demonstrate 
Opens a short video clip that demonstrates the basic workflow of this form.
Help 
Opens this section of the manual.
Apply
Commits all pending edits to the real-time host. See Apply .
Cancel
Discards all pending edits.
Allowed and Denied Hosts Tables
The Allowed Hosts table lists the IP addresses or domain names of systems allowed to interact with the data logging host.
To add an IP address or domain name, click on the New Allowed button. A new entry called NewHost will be created. Double click on it, and type in the desired IP address or domain name.
IP addresses may use an asterisk as a wild card in place of a specific number. For example, 192.168.*.* would signify any IP address beginning with 192.168.
The Denied Hosts table lists the IP address or domain names of systems that are exceptions to those listed in the Allowed Hosts table. For example, 192.168.1.* could be denied access while all other IP addresses in 192.168.*.* are allowed access to the data logging host.
Entries in the table may be deleted by selecting an entry and clicking on the Delete Host button.
Creates a new entry in the allowed hosts table. This is an IP address or domain name allowed to access the data logging host from the MATLAB program. The IP address may substitute an asterisk for an element to act as a wildcard, for example, 192.168.*.*.
Creates a new entry in the denied hosts table. This is an IP address or domain name denied access to the real-time host from the MATLAB program. The IP address may substitute an asterisk for an element to act as a wildcard, for example, 192.168.1.*. Denied takes precedence over allowed names and addresses.
Deletes the selected host from the Allowed Hosts or Denied Hosts tables. This button is enabled only if a host is selected in one of the tables. Selecting anything in one table will deselect any selection in the other table, so only one host entry is selected at a time.
Defines named groups to which resources (scripts, user programs, Simulink models, RTDBs, tests, and test suites) may be assigned and which access to may be restricted to specific users.
Resources are assigned to groups in each resource’s configuration form. See Scripts..., User Programs..., Simulink Models..., New/Select RTDB..., Tests..., and Test Suites....
Users are given access by selecting the user in the user table and checking the appropriate check boxes in the group table.
A group named ALL is special. No resource may be assigned to this group. If an administrator is given access to ALL, he will see all resources, regardless of their group, in the forms, but he still can only access a resource if he is specifically given access to its group.
Deletes the selected group. This button is enabled only if a group is selected. A group cannot be deleted while there are still resources assigned to it. Instead a non-modal dialog will be displayed listing the resources assigned to the group.
Creates a new group. Double click on the group name to rename it. Groups may not be renamed once resources are assigned to them.
Defines users authorized to interact with the real-time host through the Control Center and HMI Display.
Name of a user.
To add a new user, click on the New User button.
To change the name of a user, double click on the table cell with the user name and type in a new one. If the password is unavailable, it will be reset to the default “password”.
Privilege level of the user. Double click on the cell to get a drop down menu of privilege levels to choose from.
User with full privileges to configure the real-time host through the Control Center.
User with permission to begin and monitor test runs.
User with permission to monitor test runs.
Password of the user. Passwords from previous Control Center sessions are unavailable. If a user forgets his password, an administrator must assign him a new password. Passwords from the current session are obscured with asterisks unless the Reveal Passwords option is selected, in which case the password is displayed in the clear.
To change a password, double click on the cell with the password to change. If Reveal Passwords is selected, the password is edited in the clear directly in the table. If Reveal Passwords is not selected, a dialog is displayed in which the password is obscured with asterisks and in which the user must enter the password a second time to verify it.
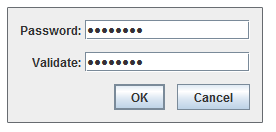
Press OK to change the password to the validate value or Cancel to leave the password unchanged.
Groups to which the user has access. When a user is selected, the group table’s check boxes will reflect the selected user’s groups. Check or uncheck those check boxes to change the groups the selected user has access to.
Deletes the selected user.
Creates a new user with default settings and a unique name. Double click on the cell with the new user’s name to type in a new name.


