Introduction to the Control Center
The Control Center is the GUI tool for configuring the real-time host. It can also launch and monitor test sessions. The Control Center need not run on the real-time host, but may be installed on Linux or Microsoft Windows systems and communicate with the real-time host via a network connection as a client program.
The HMI Display tool is the GUI tool to run customized monitoring displays of the RTDB of a running test. It can also be used to launch test sessions. The Control Center can also be used view displays.
Launching the Control Center and HMI Display Tools.
To launch the Control Center, run:
$ /usr/bin/simwb
To launch the HMI Display tool, run:
$ /usr/bin/hmidisplay
To launch the Control Center, double click the Control Center icon on the desktop or select Start → All Programs → SIMulation Workbench → Control Center.
To launch the HMI Display tool, double click the HMI Display icon on the desktop or select Start → All Programs → SIMulation Workbench → HMI Display.
Logging into the Real-Time Host
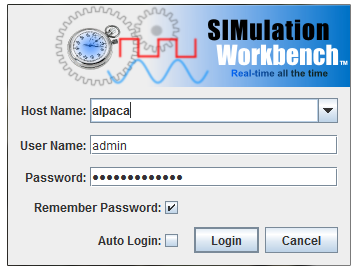
The first thing the Control Center and HMI Display tools show is a login window.
Host Name
IP address or domain name of the real-time host. The five most recently accessed host names are remembered across program invocations for each Linux or Windows user. Click on the downward pointing arrow on the right side of the text field to get a drop down menu of the recently accessed servers or type in a new server name in the text field.
It is necessary that two way communication be possible between the client program (Control Center or HMI Display) and the real-time host server software. That is, each must be able to open ports on the other. VPN or firewall settings must not block the real-time host from opening transient ports listened to by the client programs.
User authorized to access the real-time host software. This is not the same as a Linux user on the real-time host. See Authentication... for setting up SIMulation Workbench users. The clients remember the most recently used User Name across program invocations.
SIMulation Workbench user’s password. See Remember Password below.
Remember Password
Remembers the most recently used password across program invocations.
Auto Login
Automatically logs in using the remembered User Name and Password (see Remember Password above). This setting is remembered across program invocations.
Once set, the login dialog will not be displayed on future invocations of the client programs. See Disable Auto Login for how to disable Auto Login after logging in.
Login
Logs in to the real-time host using the credentials supplied above.
Cancel
Closes the login dialog without logging in.
The Control Center interface consists of a number of forms that may be opened in the main window as tabs. These forms are opened from the menu bar or Road Map tab.
The Road Map form can be detached from the main window and displayed in its own floating window. This is done by clicking on the  (detach) button on the tab. The forms for building programs, building displays, and viewing real-time data can also be detached. Clicking on the close window button in the title bar brings the form back into a tab in the main window.
The Road Map form cannot be closed. The other forms can be closed by clicking on the  (close) button on the tab. Closing a form does not discard un-committed edits made by that form unless otherwise specified in the form’s documentation.
All forms are laid out in a similar manner (to the degree that makes sense for their function). Each corner contains similar functionality on each form, while the main display lies in the center.
Upper Left Corner: Icon and Title
The upper left corner has the tab’s icon and title. For most forms this title is identical to the label on the tab. For forms with more dynamic content, the title on the form may indicate that content. The Road Map form has several different views of the SIMulation Workbench road map available. Each view has its own title. The I/O Mappings form sets the title to be the currently selected I/O device.
Upper Right Corner: Options and Help
The upper right corner has settings the effect the appearance of the form and has the help buttons.
Opens up a short video clip (one to four minutes) that demonstrates the basic workflow of the current form.
Opens up this manual to the documentation of the current form. For forms with dynamic content, it will open this manual to the documentation of the current dynamic content. For Road Map, it will open this manual to the documentation of the current view.
Lower Left Corner: Edit Commands, etc.
The lower left corner typically has editing commands for the current form. For the Road Map form, it has options that effect the whole user interface. Most forms also have an Edit menu in the menu bar for these buttons.
Lower Right Corner: Status and Apply/Cancel
The lower right corner, for most forms, shows the RTDB currently loaded for editing and Apply/Cancel buttons for applying the edits to real-time host. For the HMI Builder form, the lower right corner shows the currently selected widget’s type.
Indicates which real-time database is getting its I/O points and hardware mappings edited. This is distinct from the RTDB loaded by a running test.
Commits all pending edits to the real-time host. When moving from form to form and making changes, the changes are made in the Control Center’s cache only (unless otherwise noted in the documentation of a form) until the Apply button is pressed.
The Apply button is only enabled when there are pending edits and no edit is flagged as an error. Edits are flagged as an error by highlighting their background in red.
Error entries are discarded when their containing form is navigated away from, reverting the setting back to its most recent valid value.
Discards all pending edits.
The Cancel button is only enabled when there are pending edits to discard.
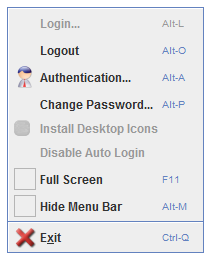
Commands that deal with a SIMulation Workbench user.
Logs in to a real-time host. See Logging into the Real-Time Host.
Logs out from a real-time host.
Configures SIMulation Workbench users on the real-time host. The user must be logged into the server as an Administrator user. See Authentication....
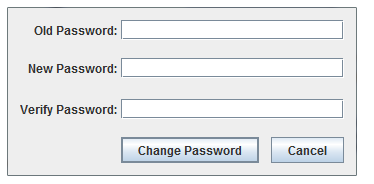
Changes the password of the currently logged in user.
Creates desktop icons for Control Center and HMI Display for Linux uses. This option is disabled for Windows users as the installer installs desktop icons for all users by default.
Disables Auto Login so that the next time the Control Center is launched, the user will be presented with a login dialog.
Enables/Disables full screen mode. In this mode, the Control Center’s main window occupies the full screen. There are no desktop task bar, window decorations, or window status bar displayed in this mode. This may not work on Linux if the window manager does not support full screen mode.
Enables/Disables the menu bar. Keyboard shortcuts are also disabled when the menu bar is hidden. The user must use the Road Map form to open forms and execute other commands.
Exits the Control Center program.
Between the User menu and the Database menu, each form may have its own menus injected. These are typically File and Edit menus. See the documentation of each form for details.
Commands that configure hardware, the I/O points of a real-time database (RTDB), and mappings between them.
Configures the I/O devices available on the real-time host. See I/O Devices....
Configures the I/O tasks that read from and write to I/O devices. See I/O Tasks....
Creates a new real-time database or select the real-time database for editing. The currently selected RTDB will be displayed in the lower right corner of forms where this information is relevant.

See New/Select RTDB....
Configures the I/O points that can hold an analog numeric value. See Analog Points....
Configures the I/O points that can hold a digital boolean value. See Digital Points....
Configures the I/O points that can hold a block of bytes, such as a text string or a block of binary data. See String Points....
Configures complex conversion equations between the raw value that is read from or written to hardware and the units of an analog point. See Engineering Units Conversions....
Specifies which hardware channel or message field that an I/O point is mapped to for reading or writing. See I/O Mappings... and Configuring I/O Devices.
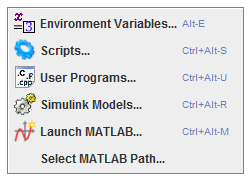
Edits various programming resources used by a simulation test.
Edits the sets of environment variable settings that can be used when building models or running tests. See Environment Variables....
Edits and compiles scripts on the real-time host using a mini-IDE (Integrated Development Environment). See Scripts....
Edits and compiles user model programs on the real-time host using a mini-IDE. See User Programs....
Edits and compiles Simulink models on the real-time host using a mini-IDE. See Simulink Models....
Launches MATLAB on the local machine. The first time this command is invoked, a file browser dialog will be shown to allow the user to browse to the MATLAB program. That path is remembered in later invocations of the Control Center so the browser dialog will not be displayed again. See “Select MATLAB Path...” below to change it.
Changes the remembered path to the MATLAB program.
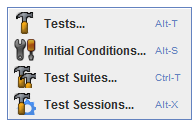
Configures and runs simulation tests.
Configures a simulation test. See Initial Conditions... to configure initial condition sets associated with each test. See Test Sessions... to configure and run sessions of a test. See Tests....
Configures the initial conditions of a test. Initial conditions are set on points in the RTDB before the test is run. These settings include the values and logging settings of I/O points, model parameters and model signals. See Initial Conditions....
Configures sets of tests to run in sequence. See Test Suites....
Configures and runs an individual instance of a test run. See Test Sessions....
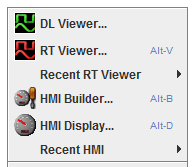
Monitors running simulation test.
Displays the values of logged variables after a test has run using graphs and tables. See Data Log Viewer Overview.
Monitors and modifies the values of points in running test’s active RTDB in real-time. See Real-Time Viewer Overview.
List of recently opened RT Viewer configuration files. Select one to open RT Viewer with that file.
Creates a custom display for monitoring and modifying the values of points in running test’s active RTDB in real-time. See HMI Builder Overview
Monitors and modifies the values of points in a running test’s active RTDB in real-time using a custom display created with the HMI Builder form. See HMI Display.
List of Recently opened HMI displays. Select one to open the display.
Manages the locations of files used by HMI displays. See HMI File Manager.
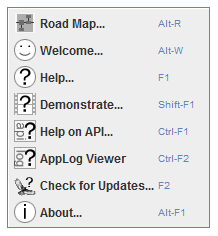
Gets Help on the SIMulation Workbench product.
Brings the Road Map form to the top (the Road Map form cannot be closed). The Road Map form provides a visual front-end to accessing the various forms. It arranges them in various logical ways to help the user find his way around the Control Center. See Road Map Overview.
The initial welcome screen for first time users. See Welcome.
Obtains help on the currently displayed form. See Help Overview.
Views a short video demonstrating the basic work flow of the currently displayed form. See Demonstration Videos.
Obtains help on the various application programming interfaces. See Help Overview.
Displays the configuration and data log servers’ log files. See TODO
Checks https://redhawk.ccur.com for updates to the Control Center. See Check for Updates.
Shows information about this version of the SIMulation Workbench Control Center. See About.
Right clicking on empty areas of forms will bring up the context menu.
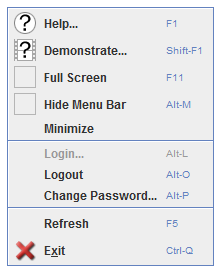
Obtains help on the currently displayed form.
Views a short video demonstrating the basic work flow of the currently displayed form.
Enables/Disables full screen mode. In this mode, the Control Center’s main window occupies the full screen. There are no desktop task bar, window decorations, or window status bar displayed in this mode.
Enables/Disables the menu bar. Keyboard shortcuts are also disabled when the menu bar is hidden. The user must use the Road Map form to open forms and execute other commands.
Minimizes the Control Center’s main window.
Logs in to a real-time host. See Logging into the Real-Time Host.
Logs out from a real-time host.
Changes the password of the currently logged in user.
Forces re-reading all cached data from the real-time host.
Exits the Control Center program.